

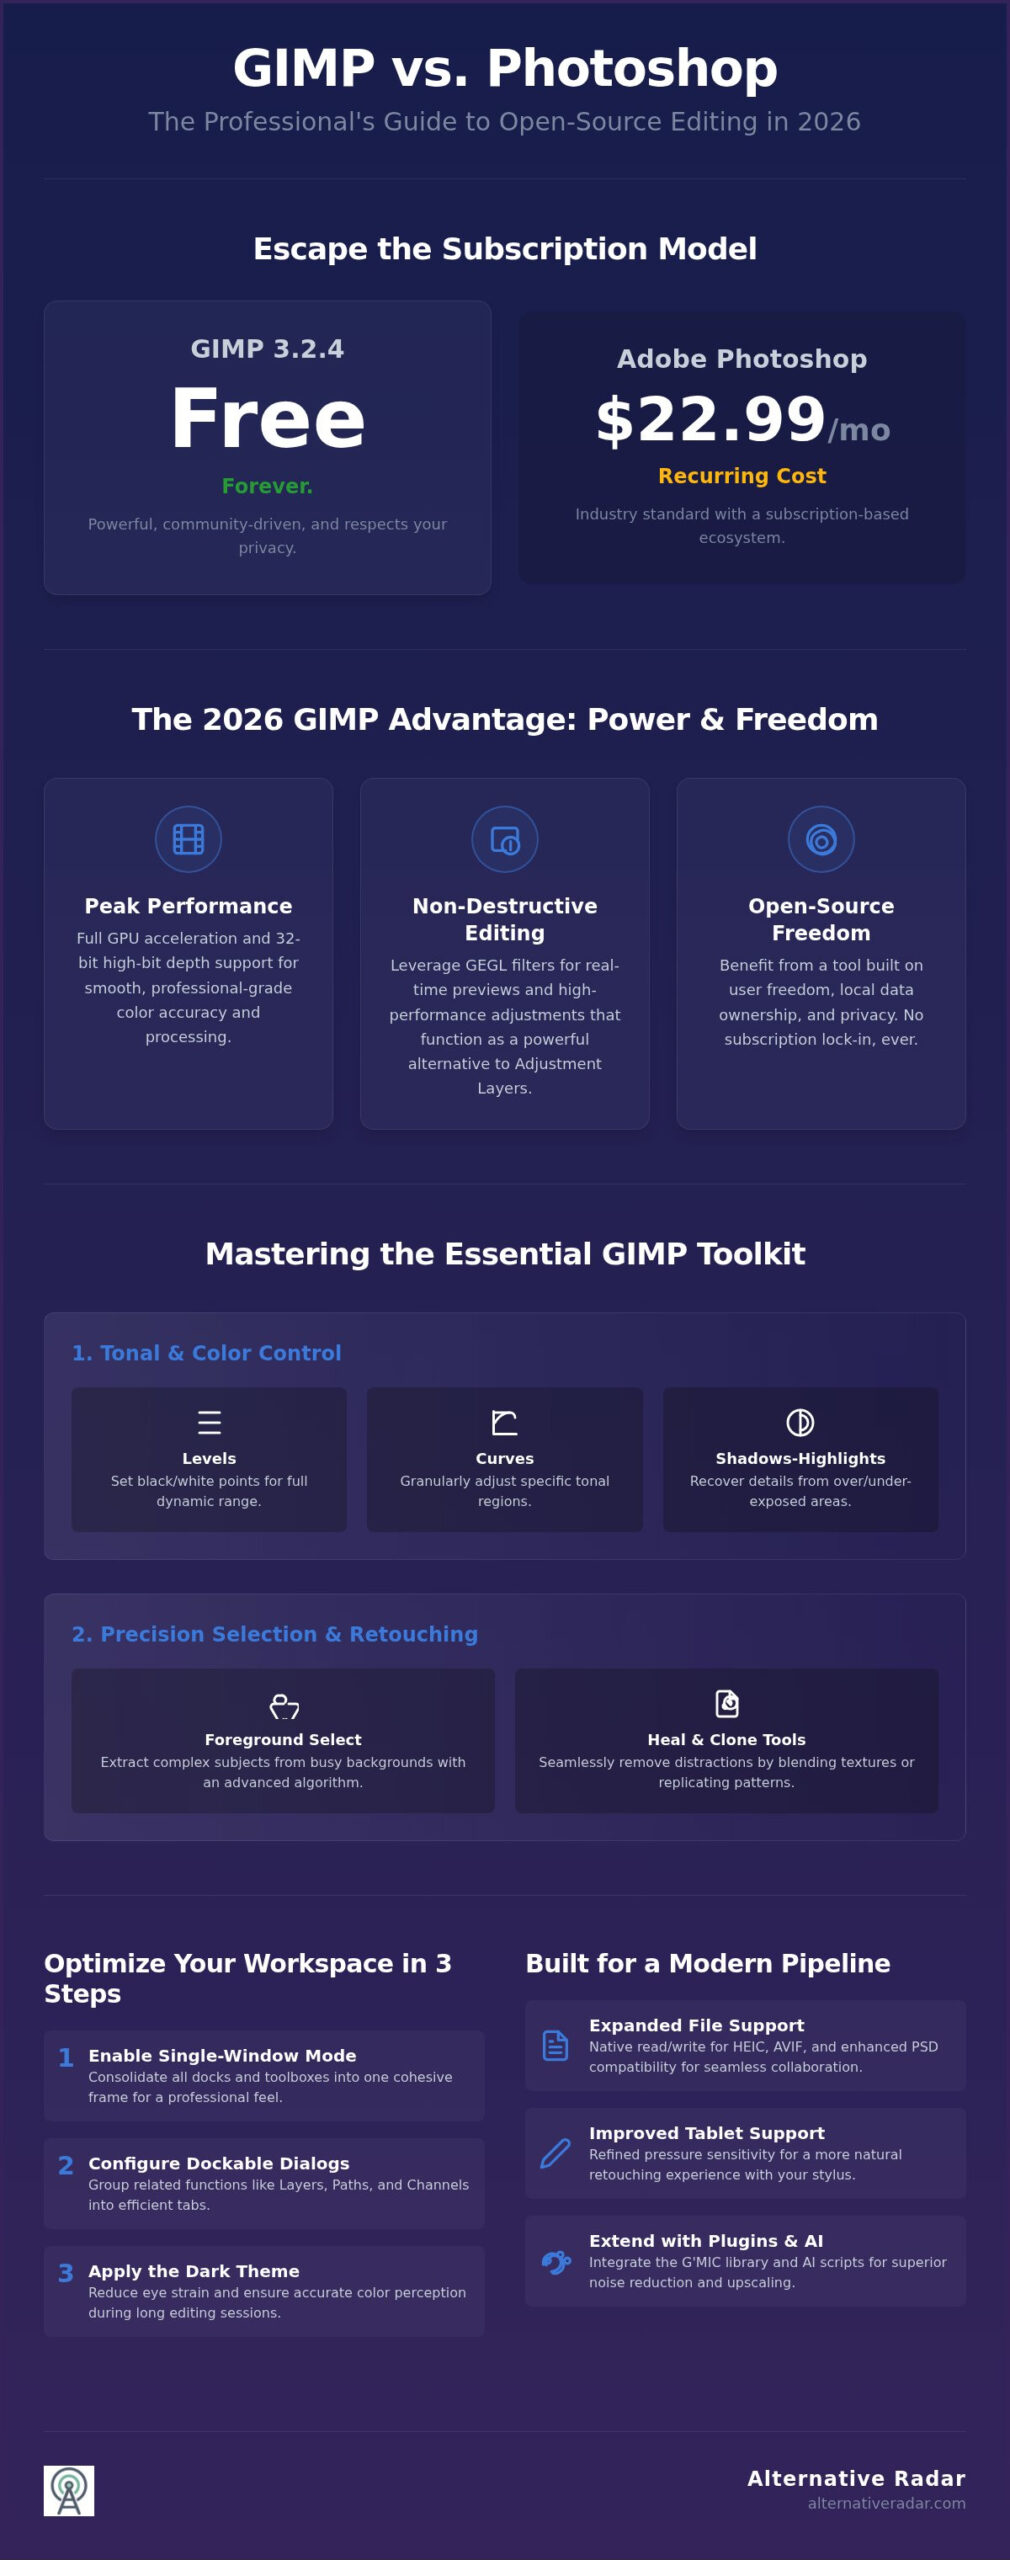
Paying a monthly subscription fee of $22.99 for professional photo editing is a choice, not a mandatory business expense. While the industry often defaults to the Adobe ecosystem, a deep dive into gimp vs photoshop features in 2026 reveals that open-source software provides the same high-level control without the recurring cost. You might feel that GIMP’s interface is too clunky or that the learning curve is too steep compared to the streamlined mobile apps you use daily. It is frustrating to waste time hunting for basic tools when you just want to finish a project.
We understand that efficiency is your priority. This guide promises to transform your photography by teaching you a clean, non-destructive workflow using GIMP 3.2.4. You will learn how to achieve professional-looking color grading and gain the confidence to use open-source tools for your business. We will break down the essential toolsets, compare them to their premium counterparts, and show you exactly how to set up a workspace that maximizes your productivity from day one.
Key Takeaways
- Utilize GIMP 3.2.4’s full GPU acceleration and high-bit depth support to process professional photography without the hardware bottlenecks found in older versions.
- Compare gimp vs photoshop features to master non-destructive editing, specifically using GEGL filters as a high-performance alternative to traditional Adjustment Layers.
- Gain precise control over image tonality and complex selections by moving beyond basic sliders to advanced tools like Curves and the Foreground Select tool.
- Implement a professional retouching sequence that starts with integrated RAW processing and finishes with seamless distraction removal using the Healing and Clone tools.
- Extend your software’s capabilities by integrating the G’MIC plugin library and AI-powered scripts for superior noise reduction and image upscaling.
Is GIMP Good for Photo Editing? Understanding the 2026 Landscape
GIMP 3.2.4 has solidified its position as the premier open-source alternative to Adobe Photoshop. In 2026, the question isn’t whether GIMP is “good enough,” but rather if your specific workflow justifies a monthly subscription fee. The philosophy of open-source software prioritizes user freedom and local data ownership. “Free” doesn’t mean low quality; it means the software is developed by a global community focused on utility rather than shareholder profits. This results in a tool that respects your privacy and works offline without constant license checks.
When evaluating gimp vs photoshop features, the 2026 landscape shows a significantly narrowed gap. GIMP now features full GPU acceleration and 32-bit float per component high-bit depth support. These technical upgrades allow for smoother rendering and professional-grade color accuracy that rivals premium suites. Professionals should consider the switch if they value software autonomy and want to escape subscription lock-in, especially as the software’s stability has reached a new peak for commercial use.
Modern GIMP Workspace Setup
The “clunky” reputation of GIMP is largely a result of legacy configurations. You can easily modernize the interface to mirror a professional suite. First, enable Single-Window Mode under the Windows menu to consolidate all docks and toolboxes into one cohesive frame. Next, configure your Toolbox and Dockable Dialogs by grouping related functions like Layers, Paths, and Channels into tabs. Finally, apply the Dark Theme in the Preferences menu. This reduces eye strain and ensures that your color perception remains accurate during long editing sessions.
The 2026 Feature Set: What is New?
The current release cycle has introduced several high-velocity improvements. The core of the 2026 experience is the expansion of GEGL-based filters. These filters provide real-time previews, allowing you to see adjustments instantly without destructive processing. Modern file support is now native, ensuring you can work with any client asset. Key gimp vs photoshop features in the 2026 set include:
- Full read and write capabilities for high-efficiency formats like HEIC and AVIF.
- Enhanced PSD compatibility that preserves layer structures for seamless collaboration.
- Improved tablet and stylus support with refined pressure sensitivity for natural retouching.
- A new zipped XML project format that enables faster save times and better data integrity.
These updates ensure that open-source users aren’t left behind as hardware and file standards evolve. By mastering these new tools, you can maintain a professional output while utilizing a lean, efficient software stack.
Mastering the Essential GIMP Photo Editing Tools
Professional results start with data analysis. Reading the Histogram is your first step. It displays the tonal distribution of your image, showing where pixels fall between absolute black and pure white. If your data is bunched against either edge, you’ve lost detail. Mastering this visualization allows you to make informed decisions before you ever touch a slider or brush.
The “Big Three” tools for tonal control include Levels, Curves, and Shadows-Highlights. Use Levels to set your black and white points quickly. This ensures your image utilizes the full dynamic range available. For more granular control, the Curves tool provides the ability to adjust specific tonal regions without affecting the entire image. Shadows-Highlights is a surgical tool designed to recover details in overexposed skies or deep shadows, preventing the flat look common in amateur edits.
Precise editing requires precise selection. When analyzing gimp vs photoshop features, the selection tools are often the deciding factor for professional retouchers. While the rectangle tool is fine for crops, the Foreground Select tool uses an algorithm to extract complex subjects from busy backgrounds. For absolute precision, the Paths tool creates vector-based outlines that you can refine indefinitely. Once your selection is set, use the Heal and Clone tools for retouching. The Heal tool blends pixels with the surrounding texture by calculating the lighting of the target area; the Clone tool replicates specific patterns exactly to cover large distractions.
Advanced Tonal and Color Correction
Cinematic contrast often comes from an S-curve in the Curves dialog. This lifts the blacks slightly while darkening the shadows to create a professional film look. For color adjustments, use Color Balance for overall temperature shifts and Hue-Saturation for targeting specific color channels like skin tones. GEGL filters act as the backbone of modern GIMP processing, providing real-time mathematical operations for every adjustment you make. Understanding these gimp vs photoshop features allows you to transition between platforms without losing technical accuracy.
Non-Destructive Editing with Layer Masks
Stop using the Eraser tool immediately. It is a destructive habit that permanently removes pixel data. Instead, use Layer Masks to hide or reveal parts of a layer. This allows you to paint with black to hide and white to show, keeping your original image intact. Organize these edits using Layer Groups to maintain a tidy workspace. If you want to expand your toolkit, you can explore other Adobe alternatives that fit your specific creative needs.
GIMP vs. Photoshop Workflow: A Comparison for Switchers
Switching software requires a vocabulary shift. In the Adobe ecosystem, you rely on Adjustment Layers for non-destructive edits; in GIMP, you achieve this through GEGL Filters. While the interface logic differs, the mathematical results are identical. Comparing gimp vs photoshop features requires looking at how these tools interact with your hardware. Performance metrics on mid-range 2026 hardware, such as a Ryzen 5 with 16GB of RAM, show GIMP 3.2.4 launching in roughly 4 seconds. Photoshop 27.9.1 often takes 15 to 20 seconds as it verifies cloud licenses and initializes AI modules. For high-velocity creators, this speed difference is a tangible productivity gain.
Community-driven tools are the lifeblood of open-source software. While Adobe offers proprietary add-ons through a central marketplace, GIMP relies on a decentralized plugin ecosystem. This means you have access to specialized tools developed by photographers for photographers, often without additional costs. To see how these tools fit into the current market, you can review the best free alternatives to photoshop for a broader view of the 2026 landscape.
Bridging the Interface Gap
Muscle memory is the hardest thing to override. You can bypass the learning curve by using PhotoGIMP, a configuration patch that mimics Photoshop’s layout and keyboard shortcuts. This setup moves the toolbox to the left and layers to the right, aligning the workspace with your existing habits. You should also set up custom keyboard shortcuts for your most-used functions, such as “V” for the Move tool or “B” for Brushes. Handling PSD files is now more reliable in the 3.2.4 stable version. Most layer data, including blending modes and masks, translates accurately, though you should flatten proprietary Smart Objects before exporting from Photoshop to ensure a clean transition.
Cost-Benefit Analysis of Open Source
The financial math is simple. A Photoshop Single App subscription costs $22.99 per month. Over five years, that totals $1,379.40. GIMP remains at zero cost. This allows you to reallocate your budget toward better hardware or lenses. Privacy is another critical factor. Local software operates entirely on your machine, meaning your creative assets aren’t used to train generative AI models without your explicit consent. Making a strategic software plan is essential for long-term growth. We recommend finding the best alternative to popular software to ensure your tech stack remains both efficient and affordable.
Professional Retouching: A Step-by-Step GIMP Guide
Professional retouching requires a structured sequence to maintain image integrity. Successful projects begin with RAW processing. Since GIMP 3.2.4 integrates with external processors like Darktable and RawTherapee, you can perform initial exposure and lens corrections before the data reaches the main workspace. Once imported, your first priority is cleaning the canvas. Use the Healing tool to remove minor blemishes by blending surrounding textures, and reserve the Clone tool for larger distractions that require exact pixel replication.
Advanced users often compare gimp vs photoshop features when executing Frequency Separation. This technique involves splitting your image into a high-frequency layer for texture and a low-frequency layer for color. By editing these independently, you can smooth skin tones without losing the natural pore structure. Finally, apply color grading using GEGL-based filters and conclude with a High Pass filter for targeted sharpening based on your final export target. If you’re looking to expand your production capabilities, you can explore professional software alternatives that streamline these complex tasks.
High-End Portrait Editing
Portraiture in GIMP benefits from the Warp Transform tool, which acts as a powerful equivalent to Photoshop’s Liquify. Use it with a low strength setting to make subtle structural adjustments to hair or clothing. This allows for realistic modifications without the digital distortion often seen in mobile editing apps.
Enhancing facial features requires localized dodge and burn techniques. By creating a transparent layer set to Overlay or Soft Light, you can paint with white to enhance the catchlights in eyes or black to define jawlines. This method provides professional depth without destroying the underlying pixel data, ensuring your portraits maintain a high-end commercial feel.
Landscape and Architectural Correction
Architectural photography often suffers from keystone effects where buildings appear to lean. Fixing perspective with the Unified Transform tool is a standout among gimp vs photoshop features, offering a more consolidated experience than Adobe’s multi-step transform process. It allows you to adjust rotation, scale, and perspective within a single operation, saving significant time during the correction phase.
For complex lighting, use Luminosity Masks to gain granular control over specific brightness ranges. Luminosity Masking is a technique for targeted exposure control based on brightness. This approach ensures your landscapes maintain a high dynamic range while looking natural, allowing you to darken overexposed skies without affecting the details in the foreground greenery.
Optimizing GIMP with 2026 Plugins and AI Tools
GIMP 3.2.4 provides a robust core, but its true power lies in its extensibility. When you analyze gimp vs photoshop features in a professional environment, you’ll find that plugins often bridge the gap between open-source and proprietary capabilities. G’MIC-Qt is the premier example. It offers over 500 filters ranging from technical noise reduction to complex artistic stylization. Unlike Adobe’s cloud-reliant AI modules, many GIMP AI scripts for noise reduction and upscaling run locally. This ensures your data stays on your machine while providing high-quality results for low-light photography.
Efficiency-driven editors should utilize Python-Fu scripts for high-volume tasks. If you’re managing hundreds of product shots, batch processing allows you to apply the same tonal corrections and watermarks instantly. This automation is vital for maintaining a professional pace. For digital marketers, GIMP’s export options are optimized for SEO. You can fine-tune compression levels for WebP and AVIF formats, ensuring your site maintains high page speeds without sacrificing visual quality.
The Essential Plugin Toolkit
Installing G’MIC-Qt is a mandatory step for any professional switcher. It provides tools for technical repairs, such as dead pixel removal and advanced sharpening, that are often hidden behind subscription walls elsewhere. For high-end RAW development, the integration with Darktable or RawTherapee allows you to handle 32-bit floating-point data with precision. Don’t overlook Resynthesizer; it remains the most effective open-source answer to Photoshop’s Content-Aware Fill. It uses a sophisticated texture synthesis algorithm to remove unwanted objects while seamlessly reconstructing the background.
Future-Proofing Your GIMP Skills
The GIMP development roadmap points toward even deeper non-destructive capabilities in the upcoming 3.4 release. Staying updated with these community releases ensures you remain competitive. You can contribute by reporting bugs or suggesting features through the official developer channels. This collaborative model is why GIMP remains a viable long-term solution for designers. It isn’t just a free tool; it’s a strategic choice for those who value technical transparency and software longevity. Comparing gimp vs photoshop features reveals that while Adobe leads in marketing, the open-source ecosystem leads in user empowerment and local control.
Future-Proof Your Creative Workflow
Mastering GIMP 3.2.4 isn’t just about saving money; it’s about gaining total control over your digital workspace. By implementing non-destructive workflows and leveraging GEGL-based filters, you can match the output of premium suites without the monthly overhead. When you evaluate gimp vs photoshop features, the decision often comes down to your preference for privacy and efficiency over cloud-based AI dependency. You now have the roadmap to configure a modern interface, utilize advanced frequency separation, and optimize your exports for the web.
Choosing the right tools requires a clear view of the entire software landscape. If you’re ready to explore more ways to optimize your production stack, you can find the best software alternatives on Alternative Radar. We provide objective, expert-led software comparisons and curated lists of the best free equivalents to help you make smarter choices. Don’t settle for market leaders by default; start building a professional editing suite that respects your resources and your data today.
Frequently Asked Questions
Is GIMP actually as good as Photoshop for professional photography in 2026?
Yes, for most professional raster editing tasks. It supports 32-bit float per component and full GPU acceleration in version 3.2.4. While it lacks Adobe’s proprietary cloud-AI generative tools, its core editing engine is comparable. Professionals who prioritize privacy and local processing find it a superior choice for high-end color grading and retouching without subscription lock-in. It provides the same technical depth required for commercial photography.
Can I open and edit RAW files directly in GIMP?
GIMP handles RAW files through seamless integration with external processors like Darktable or RawTherapee. When you open a RAW file, GIMP automatically launches the linked processor. You make your initial exposure and lens corrections there; once you close the processor, the image imports into GIMP as a high-bit depth layer. This workflow ensures you maintain maximum image data throughout the editing process without the need for proprietary file conversion tools.
Does GIMP support non-destructive editing like Adjustment Layers?
GIMP 3.2.4 uses GEGL filters to provide non-destructive editing capabilities. While it doesn’t use the exact “Adjustment Layer” terminology found in Photoshop, GEGL filters allow you to preview changes in real-time and modify them later. When comparing gimp vs photoshop features, this implementation provides similar flexibility for tonal and color corrections without permanently altering the original pixels of your base layer.
How do I install plugins like G’MIC in GIMP?
Install G’MIC by downloading the G’MIC-Qt installer for your specific operating system. Once you run the installer, it automatically detects your GIMP 3.2.4 installation path and adds the plugin to the Filters menu. For other scripts, you typically move the .py or .scm files into the “plug-ins” or “scripts” folders located within your GIMP user profile directory, which you can find under Preferences. This manual process ensures you maintain control over your extensions.
What are the best keyboard shortcuts for faster photo editing in GIMP?
Speed up your workflow by mastering these essential shortcuts:
- Shift + C: Crop tool
- M: Move tool
- Shift + B: Bucket Fill
- Shift + O: Select by Color
- Ctrl + L: Open Layers dialog
- Shift + S: Unified Transform
Customizing these in the Preferences menu to match your muscle memory is the most effective way to increase your editing velocity. These keybindings allow you to stay focused on the canvas rather than searching through menus.
Is GIMP safe to download and use on Windows 11 and macOS?
GIMP is entirely safe as long as you download it from the official gimp.org website. It is a well-vetted open-source project with a global developer community. Version 3.2.4 is fully compatible with Windows 11 and recent macOS versions, including native support for Apple Silicon. Because it is local software, it doesn’t track your usage or upload your private creative assets to external servers. This makes it a secure choice for sensitive commercial work.
Can GIMP handle CMYK color profiles for professional printing?
GIMP 3.2.4 supports CMYK through its advanced color management system and GEGL operations. You can import ICC profiles from your printer and use the built-in soft-proofing tools to verify how colors will appear on paper. While Photoshop has historically led in this area, GIMP’s current high-bit depth engine ensures professional-grade accuracy for preparing files for commercial print houses. This capability is essential for designers moving from digital-only work to physical media production.
How do I make GIMP look and feel like Photoshop?
Enable Single-Window Mode under the Windows menu to consolidate the interface. You should also go to Preferences and select the “Dark” theme with “Symbolic” icons for a modern aesthetic. When analyzing gimp vs photoshop features, using the PhotoGIMP configuration is the fastest way to reorganize the toolbox and layers to match Adobe’s layout. This setup significantly reduces the friction of switching between the two platforms.