

The most expensive tool in your creative stack isn’t necessarily the one that produces the best results. When evaluating gimp vs photoshop in 2026, the gap between open-source flexibility and subscription-based dominance has narrowed significantly. While Adobe Photoshop 27.8 remains an industry giant, the latest GIMP 3.2.4 release introduces professional-grade non-destructive workflows that challenge the need for a $22.99 monthly commitment.
It’s common to feel overwhelmed by GIMP’s modular interface or to assume that “free” means “limited.” You likely want the power of high-end retouching without the financial burden of a perpetual subscription. We’ve tested the latest features to ensure you don’t have to waste time on trial and error. This guide promises to transform your approach by providing a clear roadmap for professional photo editing.
You’ll learn how to optimize your workspace for speed, master the new vector and link layers for non-destructive edits, and replicate premium effects with precision. We’ll show you exactly how to build an efficient, pro-level environment that respects both your creative vision and your budget.
Key Takeaways
- Eliminate recurring subscription fees by adopting GIMP as a professional, open-source alternative for your creative projects.
- Configure the interface for maximum productivity by activating Single-Window Mode and organizing the essential tool panels.
- Understand how gimp vs photoshop compares in a professional setting, specifically how to bridge the AI gap using external content-aware plugins.
- Implement a structured 5-step editing workflow that integrates RAW processing and precise color corrections for high-end results.
- Extend the software’s core capabilities with G’MIC-Qt and Resynthesizer to access advanced filters and professional retouching tools.
Why Choose GIMP Over Photoshop in 2026?
GIMP, the GNU Image Manipulation Program, has solidified its position as the premier open-source editor for 2026. While Adobe Photoshop 27.8 maintains a massive customer base, the debate of gimp vs photoshop often centers on long-term sustainability and resource management. Choosing GIMP means opting for a $0 price tag at a time when creative subscriptions continue to rise. For small businesses, which make up nearly 68% of GIMP’s user base, this financial freedom allows for better investment in hardware or marketing rather than software licensing.
The platform offers a level of cross-platform flexibility that proprietary software rarely matches. Whether your team operates on Windows, macOS, or Linux, GIMP provides a consistent environment without the friction of seat management or activation limits. This community-driven development model ensures the software evolves based on user needs rather than corporate profit margins. It prioritizes a privacy-first approach, keeping your creative data local and away from aggressive cloud-based AI training sets.
- Zero Cost: No monthly fees or hidden “pro” tiers.
- Full Ownership: You own the software and your workflow forever.
- Privacy: Your assets stay on your machine, not in a vendor’s cloud.
- Extensibility: A modular architecture that supports thousands of community plugins.
The Open-Source Advantage for Professional Photographers
Professional workflows require stability and transparency. Open-source software prevents vendor lock-in, ensuring you never lose access to your editing tools because of a missed payment or a change in terms of service. GIMP utilizes the GEGL (Generic Graphics Library) engine, which offers a transparent look at how your pixels are processed. In 2026, many photographers are moving toward local, private photo processing to protect their intellectual property. GIMP supports this shift by offering a powerful, offline toolkit that doesn’t report back to a central server.
GIMP vs. Basic Online Photo Editors: Why Local Processing Wins
When comparing gimp vs photoshop for high-resolution tasks, browser-based editors like Canva or Pixlr often fall short. GIMP provides high-bit depth support up to 32-bit per channel, which is essential for professional color grading and retouching. Local processing power means you can manipulate massive RAW files without the lag associated with internet-dependent tools. You don’t need a constant connection to work; GIMP provides a robust, high-performance environment that functions perfectly in any location, ensuring your productivity isn’t tied to your bandwidth.
Mastering the GIMP Interface for Maximum Efficiency
A common hurdle in the gimp vs photoshop transition is the perceived complexity of the interface. GIMP 3.2.4 defaults to Single-Window Mode, providing a unified workspace that mirrors the focused environment of premium editors. If you’re migrating from a legacy workflow, ensure this is enabled under the Windows menu. This layout prevents floating dialogues from getting lost behind your main canvas, which is essential for maintaining a high-velocity editing rhythm.
Efficiency relies on the “Big Three” panels: the Toolbox, Layers, and Tool Options. While the Toolbox contains your primary instruments, the Tool Options panel is where the real work happens. It provides the granular control needed for brush dynamics, selection modes, and scaling algorithms. You can customize your environment by dragging dockable dialogues into sidebars or stacking them as tabs. A minimalist workspace reduces cognitive load and allows you to focus entirely on the image data. If you want to refine your digital toolkit further, you can explore curated software alternatives that match your specific hardware requirements.
Speed is a professional requirement. GIMP allows for deep customization of keyboard shortcuts, enabling you to replicate your existing muscle memory. Mastering these shortcuts transforms the software from a static tool into an extension of your creative process.
Configuring the Toolbox and Tool Options
Reduce visual clutter by grouping similar tools in the sidebar. This prevents the “wall of icons” that often overwhelms new users. Grouping related functions, like selection or transform tools, keeps your workspace organized. The Tool Options panel remains your most critical asset for precision editing. It’s the only place to adjust brush hardness, opacity, and blending modes on the fly. To speed up your workflow, enable “Dynamic Keyboard Shortcuts” in the Preferences menu. This lets you assign a custom key to any menu function simply by hovering over it and pressing the desired button.
The Layers and Channels Philosophy
GIMP uses a sophisticated hierarchy of layers, layer groups, and alpha channels to manage complex compositions. Layer groups are vital for organizing projects with multiple assets, allowing you to apply effects to entire batches of content at once. Stop using the Eraser tool for professional work. It’s a destructive method that permanently removes pixel data, making future adjustments impossible. Instead, use Layer Masks to hide or reveal parts of your image. Layer Masks serve as the foundation of non-destructive editing by allowing you to modify visibility without losing the original image information.
GIMP vs. Photoshop: Evaluating Professional Output and Efficiency
In the technical evaluation of gimp vs photoshop, professional output is often the primary metric for success. GIMP 3.2.4 delivers exceptional file format support, frequently outperforming Photoshop when handling obscure or open-source extensions. While Adobe Photoshop 27.8 holds a significant lead in integrated AI features like Generative Fill, GIMP users effectively bridge this gap through community-developed plugins and external AI modules. This modular approach allows independent creators to build a bespoke toolkit tailored to their specific hardware without the resource overhead of a massive creative suite.
The learning curve is often cited as GIMP’s greatest weakness. It feels difficult because it rejects the standard Adobe UX patterns in favor of a technical, modular logic. Overcoming this requires a shift in perspective. Once you understand that GIMP prioritizes granular pixel control over guided automation, the workflow becomes highly logical. For small agencies and freelancers, GIMP is a rational choice that prioritizes performance and long-term control over your digital assets. It provides the necessary tools for high-end results without forcing you into a proprietary ecosystem.
Feature Comparison: Selection Tools, Paths, and CMYK Realities
GIMP’s Paths tool is a standout feature for vector-based selections. It offers a level of control that directly rivals Photoshop’s Pen tool, allowing for precise cutouts and complex shapes. However, native CMYK support remains a hurdle in 2026. While GIMP handles RGB workflows with 32-bit precision, print-ready CMYK conversion typically requires a workaround like the Separate+ plugin or using Scribus for the final layout. Despite this extra step, GIMP wins on system efficiency. It maintains a lightweight installer footprint of under 300MB, contrasting sharply with the multi-gigabyte Adobe installer that consumes significant system resources even when idle.
The Efficiency Gap: Scripting and Automation
Automation is where GIMP provides a distinct advantage for high-volume business tasks. Using Script-Fu, a Lisp-based scripting language, or Python-Fu, users can automate batch processing for thousands of images simultaneously. This is a critical tool for e-commerce photographers who need to apply consistent resizing or color corrections across massive catalogs. If GIMP doesn’t fit a specific niche in your production line, you can explore the best free alternatives to photoshop to find specialized tools for vector work or rapid prototyping. Community-led development is also closing the AI gap, with new open-source selection tools that use local machine learning to identify and mask objects with a single click, keeping your processing power and data privacy local.
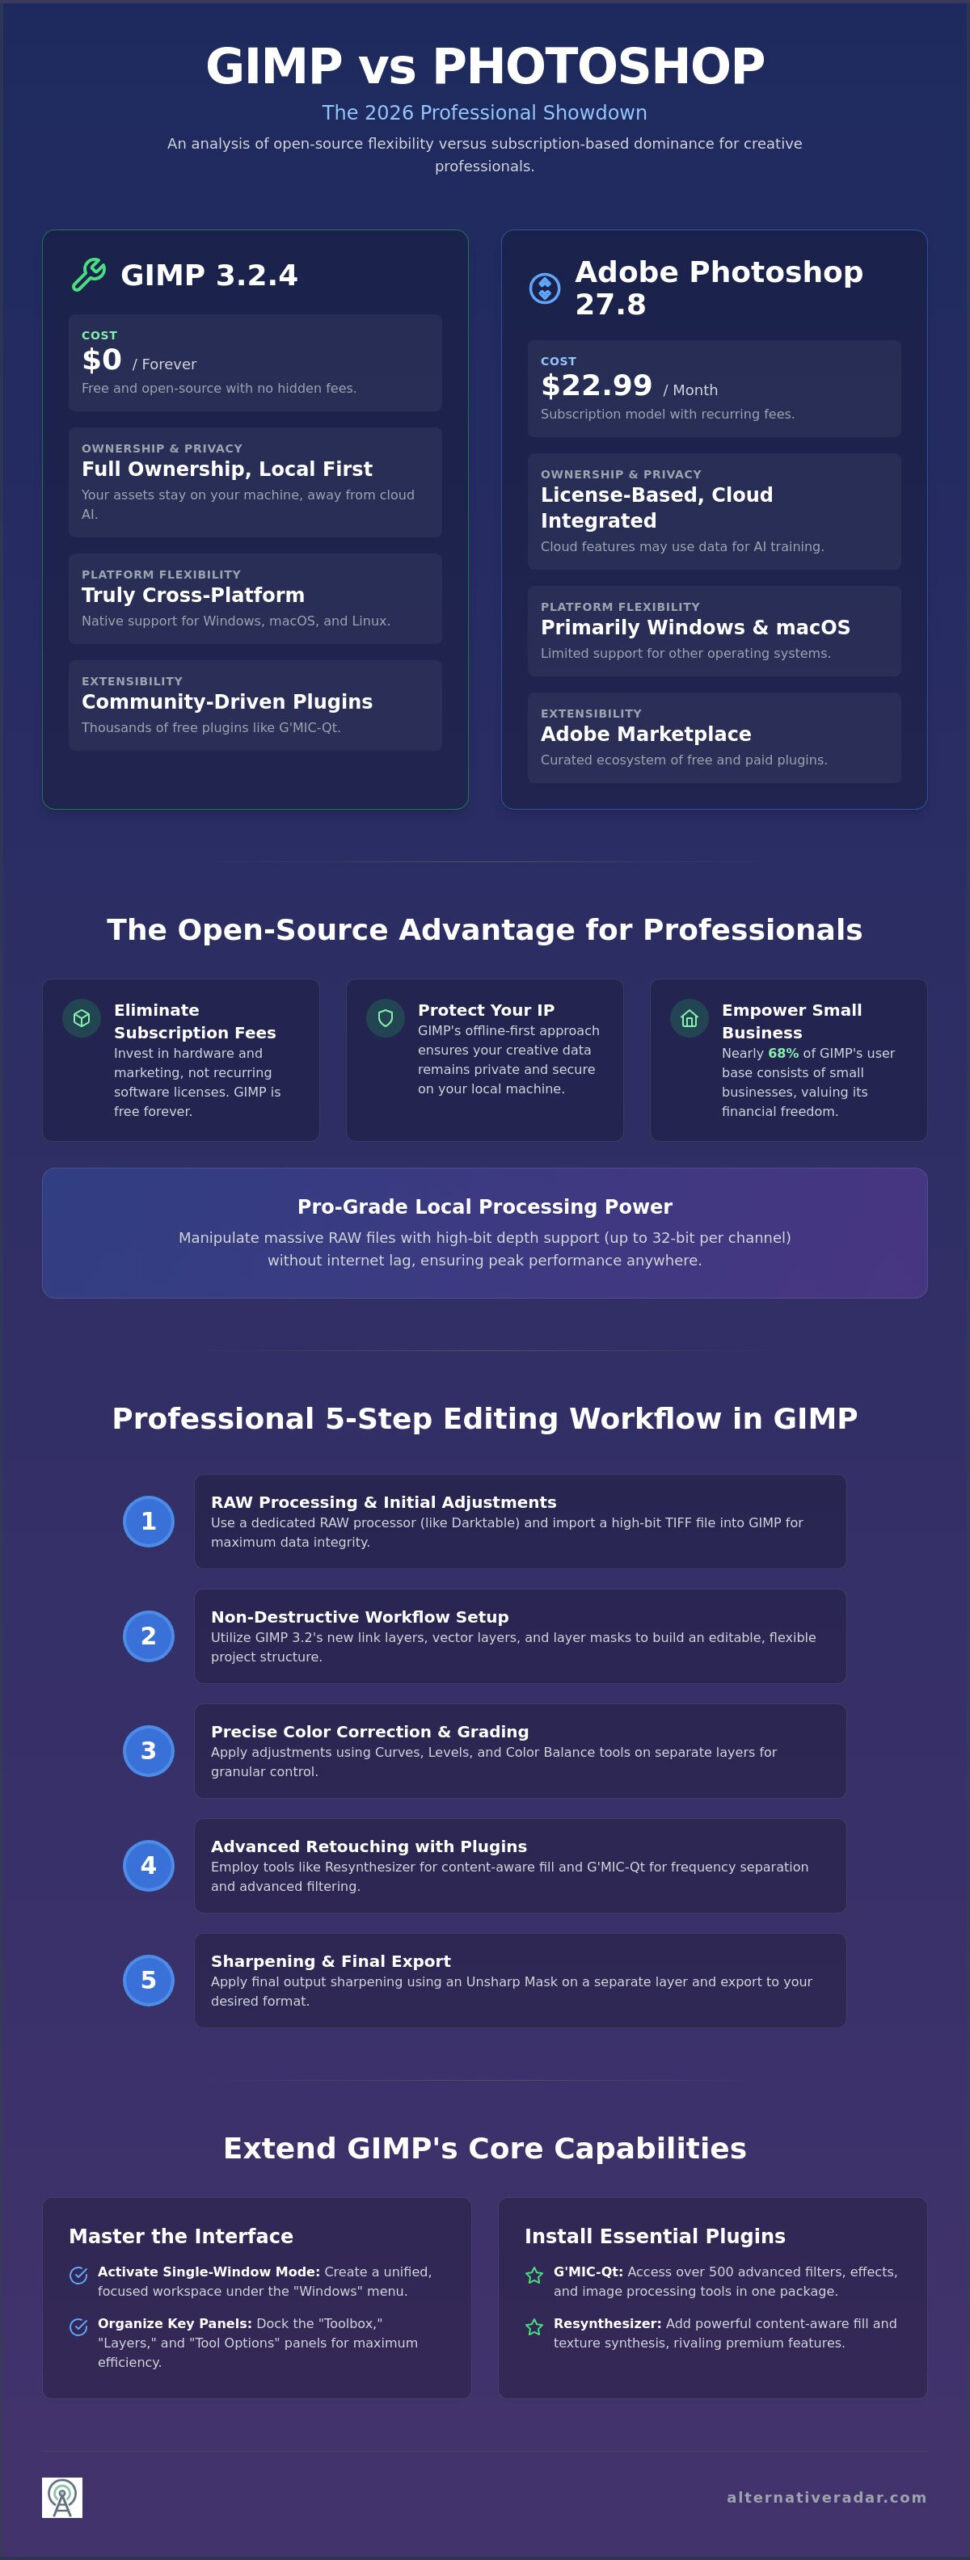
A Professional 5-Step Photo Editing Workflow in GIMP
Achieving high-end results requires a structured approach that moves logically from raw data to final sharpening. In the gimp vs photoshop comparison, GIMP’s modular nature means your workflow often begins outside the main application. Follow this 5-step roadmap to maintain image integrity and professional standards throughout the editing process.
- Step 1: Preparation and RAW Processing. GIMP doesn’t open RAW files natively. Use the Darktable or RawTherapee integration to handle initial exposure and white balance before importing the 32-bit data into your GIMP workspace.
- Step 2: Basic Corrections. Focus on global luminosity. Use the Levels and Curves tools to set your black and white points, ensuring the image has a solid tonal foundation.
- Step 3: Non-destructive Retouching. Perform skin work and blemish removal on separate layers. This allows you to adjust the opacity of your edits or revert changes without damaging the base image.
- Step 4: Creative Colour Grading. Apply GEGL operations for advanced color manipulation. This is where you establish the mood of the photo using color balance and cinematic filters.
- Step 5: Professional Exporting. Finalize your project with output-specific sharpening. Use different settings for high-resolution print than you would for web-optimized distribution.
Precision Exposure: Mastering Levels and Curves
The histogram is your primary diagnostic tool. It visualizes light distribution, showing exactly where pixels are clustered from shadows to highlights. Use the Levels tool to stretch the histogram and maximize your dynamic range. For more nuanced control, the Curves tool allows you to map specific input values to new output levels, creating precise S-curves for contrast. Levels adjust the global black, white, and mid-point anchors of an image, whereas Curves provide non-linear control over specific tonal ranges and individual color channels for surgical exposure correction. If you need more specialized tools for high-volume asset management, you can find the right creative software for your workflow on our platform.
Non-Destructive Retouching Techniques
Professional retouching avoids the Eraser tool at all costs. Use the Heal tool on a transparent layer with “Sample Merged” enabled to remove blemishes while retaining the underlying skin texture. For high-end fashion work, implement the Frequency Separation technique. This involves splitting your image into a high-frequency layer for texture and a low-frequency layer for color. This separation lets you smooth skin tones without creating an artificial, plastic look. Finally, use the Unified Transform tool to correct perspective shifts or lens distortion in a single operation, maintaining maximum pixel clarity throughout the process.
Extending GIMP: Essential Plugins and Advanced Customisation
GIMP is a modular engine. While the core installation provides a solid foundation, its true professional potential is unlocked through community-developed extensions. In the technical debate of gimp vs photoshop, Photoshop often wins on out-of-the-box features, but GIMP’s modularity allows you to build a leaner, more efficient environment. This extensibility ensures you only load the tools you actually use, avoiding the resource-heavy bloat associated with traditional creative suites. Finding the best alternative to industry-standard software requires looking beyond the base installer to the ecosystem supporting it.
Managing these additions is straightforward if you follow a structured approach. Install third-party scripts and plugins in your local user folder rather than the system directory. This practice ensures your customisations remain intact when you update the core application. It also prevents permission errors that can occur on modern, high-security operating systems.
- G’MIC-Qt: An all-in-one plugin that provides over 500 creative and technical filters.
- Resynthesizer: The primary tool for content-aware fill and texture synthesis.
- BIMP: A dedicated batch image manipulation plugin for high-volume resizing and watermarking.
- Darktable Integration: Essential for professional RAW file handling before GIMP import.
The Power of G’MIC-Qt for Photographers
G’MIC-Qt acts as the Swiss Army Knife of open-source photo editing. It bridges the gap between basic adjustments and high-end artistic effects. You can use it for sophisticated noise reduction, film grain emulation, or complex color remapping. To maintain the non-destructive workflow discussed in previous sections, always set the G’MIC output mode to “New Layer.” This allows you to blend the filtered result with your original image using layer opacity and masks, ensuring you never lose the base pixel data during creative experimentation.
Future-Proofing Your Setup with GIMP 3.0
The architectural shift introduced with GIMP 3.0, and refined in version 3.2.4, moved the software to the GTK3 toolkit. This update was critical for HiDPI support, ensuring the interface remains crisp on 4K and 8K displays. It also improved how the software handles plugin resources, making the entire environment more stable. Organize your plugin library by category and keep a backup of your configuration files. As the creative landscape evolves, you should check Alternative Radar for updates on software shifts and new open-source tools that can further streamline your professional production line.
Future-Proof Your Creative Workflow
Mastering GIMP isn’t just about saving money; it’s about reclaiming control over your creative environment. By optimizing your interface and adopting a non-destructive 5-step workflow, you can achieve results that rival industry standards. The debate of gimp vs photoshop in 2026 proves that professional output is no longer tied to a monthly subscription. You now have the technical roadmap to configure a high-velocity workspace that respects your privacy and your system resources.
We’ve shown you how to bridge the AI gap with modular plugins and how to handle RAW data with external integrations. These efficiencies transform GIMP from a simple tool into a professional-grade production engine. If you’re ready to refine your stack further, we’ve already done the heavy lifting. Explore the best Photoshop alternatives on Alternative Radar to discover 50+ creative tools evaluated for the 2026 software landscape. We provide objective, functional insights without the marketing fluff, ensuring you find the exact fit for your specific project needs. Start building your bespoke editing suite today and experience the freedom of an open-source professional pipeline.
Frequently Asked Questions
Is GIMP really as good as Photoshop for photo editing?
GIMP matches Photoshop for the majority of professional retouching, compositing, and graphic design tasks. While it lacks Adobe’s proprietary generative AI tools and built-in CMYK support, its 32-bit precision engine handles high-resolution data with comparable accuracy. The gimp vs photoshop choice usually comes down to your need for specific Adobe ecosystem integrations versus the desire for a free, local, and extensible workspace.
How do I make GIMP look and act more like Photoshop?
You can align GIMP’s interface with Photoshop by enabling Single-Window Mode and using custom icon themes. The most effective change is remapping your keyboard shortcuts to match Adobe’s defaults. Community patches like PhotoGIMP also exist to automate this setup, providing a familiar layout that reduces the learning curve for those transitioning from a subscription-based workflow.
Can GIMP open and edit PSD files?
GIMP supports PSD files natively and can open most layered documents created in Photoshop. It successfully imports layers, paths, and basic masks. However, complex features like Smart Objects or specific Adjustment Layers may not translate perfectly. If you’re collaborating with teams using the latest Adobe versions, it’s best to use standardized formats like TIFF or OpenRaster for the highest fidelity.
What are the best free GIMP plugins for photographers in 2026?
G’MIC-Qt is the essential plugin for creative filters, while BIMP (Batch Image Manipulation Plugin) is the standard for high-volume resizing. For 2026, photographers are also using specialized AI-denoising scripts and the “Liquid Rescale” tool for content-aware scaling. These additions fill the feature gaps in the base installation and allow you to build a toolkit that rivals premium software.
Does GIMP support RAW photo editing natively?
GIMP doesn’t edit RAW files directly but uses a seamless integration with loaders like Darktable or RawTherapee. When you open a RAW file, GIMP automatically triggers the external processor to handle the initial exposure and white balance. Once you close the loader, the processed image is imported into GIMP at high bit-depth for final retouching and composition.
Is GIMP safe to download and use for commercial work?
GIMP is completely safe and legal for commercial use under the GNU General Public License. You can use it to create assets for clients, marketing materials, or products without paying royalties or licensing fees. Since it runs locally, it’s often more secure for sensitive commercial projects than browser-based editors that require you to upload your intellectual property to the cloud.
How can I perform content-aware fill in GIMP?
You can perform content-aware fill by installing the Resynthesizer plugin and using the “Heal Selection” feature. This tool analyzes the surrounding pixels to intelligently fill a selected area, effectively removing large objects or distracting elements from a scene. It provides a free, local alternative to Photoshop’s Content-Aware Fill and Generative Fill for most standard retouching scenarios.
Where can I find professional GIMP tutorials for beginners?
The official GIMP documentation provides a technical foundation, but for production-focused learning, Davies Media Design offers the most comprehensive video guides. The GIMP subreddit and the Pixls.us community are also excellent resources for solving specific workflow challenges. These platforms stay updated with the 2026 software landscape, ensuring you learn techniques compatible with the latest stable releases.